Honeybees have been dying off around the world for a decade now, a phenomenon we’ve come to call Colony Collapse Disorder (CCD). Early last year, two studies finally linked a group of insecticides–neonicotinoid insecticides, to be precise–to CCD. Consequently, the European Union has begun deliberating a ban on these poisons, and movements have begun in America to force a similar ban here.
All this is completely admirable, but it doesn’t address a crucial problem of our modern food production techniques: sustaining a monoculture. By relying on one major pollinator to pollinate the majority of our food plants, that’s exactly what we’re doing. Unfortunately, as CCD has taught us, monocultures mean that one small problem can wipe out almost an entire global population of a creature. Honeybees are wonderful insects. After all, they indirectly provide most of our food through their pollinating activities AND they directly give us the glory of honey, which–in my book at least–is the true ambrosia. But clearly we shouldn’t rely upon them alone.

Meet Osmia lignaria, the creature commonly known as the Mason Bee or the Blue Orchard Bee.
Recently, several of my friends have taken to setting out funny little structures on their property to help encourage the local populations of Osmia lignaria, which in the PNW tends to go by the common name of “Mason Bee”, though my family in the orchard country of the East Coast knows them as “BOBs”, or “Blue Orchard Bees”. Unlike honeybees, which have fairly long lives and collect their food throughout late spring, summer, and early autumn, mason bees are short-lived. Adult bees typically emerge as soon as the outside temperature hits the upper 50s, and they mate and die by midsummer. By the time the adults have died, the larva they laid in little holes begins to spin a cocoon around itself and enters the pupal stage. By fall/early winter, the pupas have developed into adult bees that then go dormant in their cocoons until spring thaws the land.
However, even though the mason bee is only around to pollinate in the spring, it’s an exceptionally prolific pollinator. About 250 mason bee nesting females will pollinate an acre of apple trees. By contrast, 1-2.5 strong honey bee hives with thousands of workers in each are required to pollinate that same acre. For crops that flower in the early spring, then, the mason be just can’t be beat. A decided bonus? These bees, unlike honeybees, are not disposed to sting. In fact, it would quite literally have to be trapped in your clothing in order to want to sting you. These make them very attractive as urban pollinators.

A simple mason bee house
If you’d like to encourage the population of mason bees around your area, all you really have to do is set out a few ‘bee condos’ near areas where free dirt or mud is available (such as around your garden beds) and let nature take care of the rest. Mason bees like to nest in pre-made holes, and they typically choose ones that are between 3/8ths and 5/16ths in diameter and maybe 5 1/2″ inches deep. At the very least, all you need to do is get a drill and a drill bit that can go 5 1/2″ deep, and just drill a bunch of holes into a log that you stand upright. For the cost of a drill bit (if you don’t already have it), you’ve given Mother Nature a well-appreciated hand.
If you’d like to have something with cleaner lines, one of the simpler homes is an unfinished 6″x6″x8′ whiteboard timber with four rows of holes drilled along one 6″ face. Saw the timber into eight 12-inch pieces, then saw an angled cut to the top. Drill your holes into the face and attach a 1″x6″ piece of whiteboard to the top so that it overhang the holes by an inch or two. This will help prevent rainwater from dripping down into the holes. Add a hanger to the back and attach your bee condos to fence posts or an outbuilding, and you should be good to go.
There’s only one real problem with either of these simple bee houses, and that problem is that they’re only really useful for one season. Mason bees like to nest in fairly clean holes, so after the first year of use, you’ll see fewer and fewer bees laying their eggs in these houses. Those that do increase the chances of the larva dying, since the dirty holes have a fair amount of bee feces and pollen mites in them. What I like to do, then, is make it so that I can get clean holes every year. That’s why I’m a fan of the tray-style mason bee condo, an example of which is pictured below.
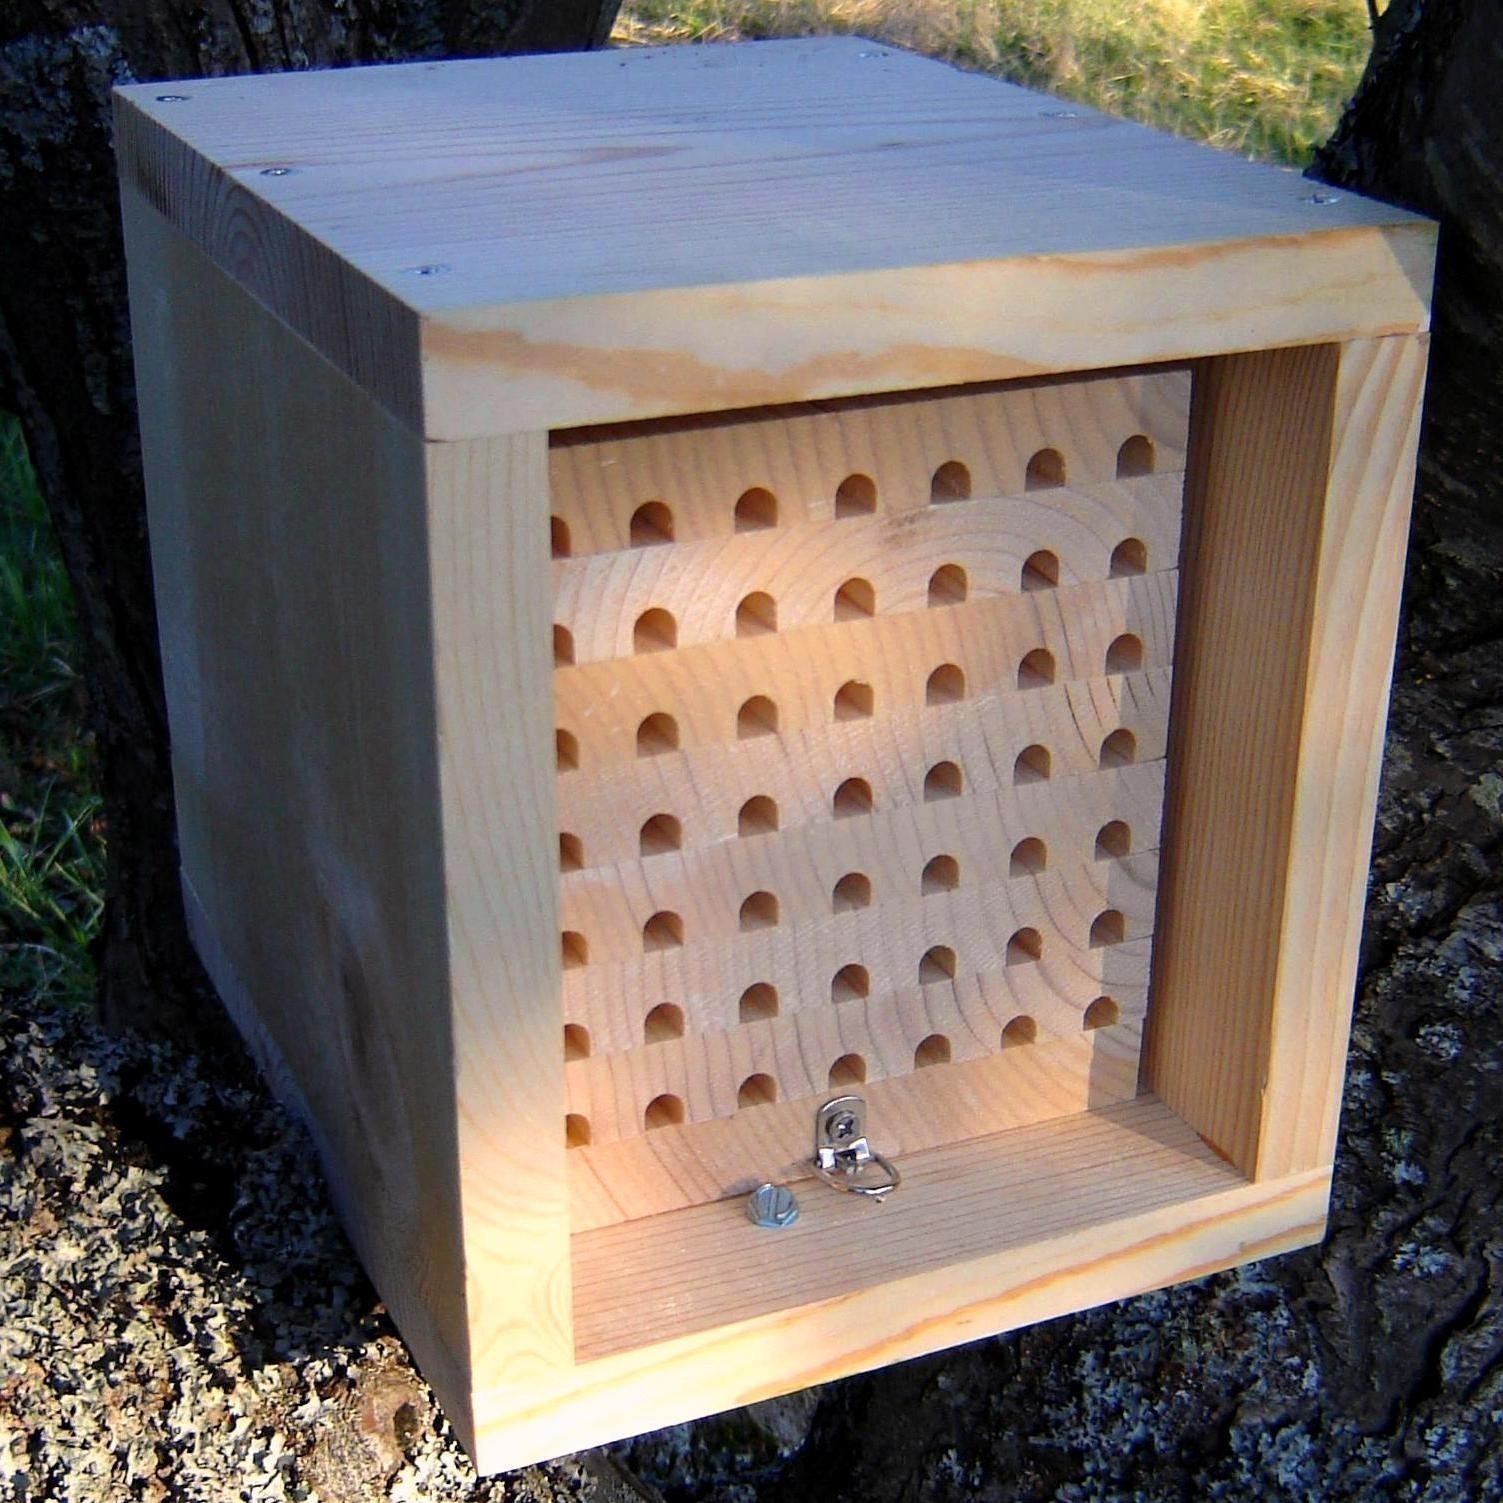
A tray-style mason bee larva house and its rain cover.
The website “How to Build a Tray Mason Bee House” provides plenty of detail in how to construct these condos. Briefly, though, you basically just work with two boards: a 1″x6″x8′ whiteboard and a 1″x8″x8′ whiteboard. The 1×6 will give you fifteen 6-inch long trays (which will accommodate a 5 1/2-inch long hole. Using a router, router table, and a 3/8″ bit, you can cut 7 grooves 5/16ths of an inch deep and 5 1/2 inches long into the 6-inch long trays. Seven trays and one blank (for the bottom one, which you’ll attach a handle to to help you remove the stack from the case) give you about a 6-inch height for the stack. You can bolt these trays together and slide them into an open faced box you fashion from the 1×8. It’s recommended to finish the box with linseed oil to help it resist rot, but to leave the trays unfinished. You might, however, wish to take a blow torch to the hole side of the tray stack and char the blonde wood, since mason bees tend to prefer holes in darker objects to holes in whiter objects.
You could get a little more involved and fashion a screen cover that would attach to the front of the house after the adult bees have died, which would help keep parasitic insects from preying on the bee larva. You’d then leave that in place until midwinter. Once the pupae have definitely entered dormancy, remove the trays from the house and use a flat-headed screwdriver to scrape the pupae and mud out of the trays. Then shake the pupae into a bowl filled with warm water and a capfull of bleach and separate out the pupae from the mud, pollen, feces, and mites. Then you rinse those off in another bowl of clean water, dry them on a paper towel, and store them in a box set in a cold place, like an unheated outbuilding, for the rest of the winter. If you must store them in a refrigerator, make sure to keep a damp paper towel in their box to maintain humidity, since refrigerators are notorious dessicators. Once the weather looks like daily temperatures will stay in the upper 50s, place the pupae in “release boxes”, or enclosed boxes with a few holes drilled in them that allow the hatched bees to escape (but allow the pupae to stay safe from bird predation). Don’t forget to return your trays to their boxes so that your new bees will have somewhere to lay their young!
Should you wish to know more about mason bee keeping, you’d do well to read “How to Manage the Blue Orchard Bee as an Orchard Pollinator”, a short book by Jordi Bosh and William P. Kemp that has been made available on a free .pdf file by the Sustainable Agriculture Network. Enjoy your new bees and your more prolific gardens and orchards!

Thanks for the clear instructions to extract and clean the cocoons in order to increase the likelihood of survival. We used store-bought wooden bee homes last year and on hatching were upset to see a remarkable number of mites on many of the bees in our garden.